Showing posts with label Before and After. Show all posts

Wednesday, September 14, 2011

One Room. Six Months.

After seeing Young House Love's eight month update post I was inspired to share the transformation that our living room has made over the past six months.  We made some major changes to this space in our house since we moved in.  We started by ripping out the carpet and painting the walls and trim.  
February 2011
September 2011
Our living room was a roller skating rink for two months before we could get the installers out to put in our new laminate floors.


Matching the existing floors in our dining room/library was easy due to the fact that they were recently installed and the previous homeowners still live in our town.  It's amazing how helpful people can be!  We ended up matching the dining room floors with Armstrong's laminate flooring in Fireside Oak.  Our installers from Lowe's were fantastic and got all 442 sq. ft. of living room AND our hallway finished in one day.  Thank you, Lowe's!


The new floors made a huge difference but without furniture we went from roller rink to bowling alley.  This is cool with me because I am an excellent bowler.  Excellent.  At least on Wii.

We worked from the floor up; naturally, furniture came next.  Thanks to our family we miraculously received some major furniture that fit perfectly in our large living room.  The couch is our haven.  For two people who were never big fans of sectionals we are all about this one.  Our room is so big that unless we bought multiple sofas, chairs, ottomans and tables the room would just swallow furniture whole.  Multiple new pieces were not in our budget so this gift of furniture could not have come at a better time.  

March 2011
April 2011
 Living Room after introduction of giant Heritage sectional.  So much seating!

When you have a large room create "areas."  We actually have four areas in our space: an area for writing, the lounging area, the reading corner and the game space.  These spaces have changed as we have settled into the house.  The addition of lamps, accent pillows made a large impact and really helped to start tying the room together.  Now for the barrage of photos!

September 2011


This is where I write my blog everyday.  This area also doubles as our game table area.
 
This room was not an exception for organization - all the little boxes around the room have a purpose, they are not just to fill the space.  The green box under the TV holds stationary, the white croc-embossed box on the coffee table holds all our remotes and Wii accessories, the pink box on the side table contains playing cards and dominoes for the game area.  The secretary acts as our "Bill Pay Center" and keeps us both on the same page.  
 
There are still a few projects that we have in mind for our space that include:  
  1. moving the two chairs on either side of the secretary over to the game table and relocate the secretary and replace with a statement like this-
  2. we have all the hardware and now we just need to hang our amazing piece of beach wood that my dad brought us from the lake
  3. before Baby A starts crawling we need to replace our concrete and glass coffee table with something a little more kid friendly, it also matches the style that we are going for in our living room a bit better than the pseudo-traditional one we have now
  4. Ballard Design will be getting a call from me soon to place an order for a 108" tablecloth
                                   2.
I saw this photo on YoungHouseLove and nearly fell out of my chair, think of all the great storage for hiding toys...

                                   3. 

I heart the Essex Printed Ottoman from West Elm that is the same shape and size of our existing table but it is upholstered to keep little heads from hitting sharp corners
                              
I'm thinking using two or three of these Ikea STRIND tables would be fun and break up all of the the angles in the room...at $99 you can't beat that.

                               4.

    So that is where we are right now.  For now; we did just come to the realization today that Baby A could still be four weeks away which leaves this little mama-to-be with some time on her hands to get crafty.  Oh, so crafty...
     

    Thursday, June 23, 2011

    It's Curtains for You

    And it's curtains for my living/dining and family rooms. Our formal living/dining room has a large picture window that faces out of the front of the house, putting us on display for the neighborhoods distress or disturbing pleasure.

    We didn't want to fork over the cash for Levolor blinds to match the rest of the house so we went with funky Ikea polk-a-dot panels and sheers. Sorry sweet neighbors no more free shows, but please enjoy the view of our funky drapes.


    I did a happy dance when I found these Umbra double-hang rods at Bed Bath & Beyond for a super steal at $24.99. That is a pretty stunning price for rods that are over 120". "Huzzah," I said to myself (out loud)! The rods were easy to install, you can see me demonstrate here, from when I installed the same curtain rod in the nursery. The curtains and sheers all came from our Swedish friends at Ikea and where purchased by my God Mama and actual Mama. Thank you!


    Next, I moved about 30 feet across the house to the family room where we had an even larger window that was creepy at night. The TV would reflect in the glass after dark making it look as though there were strangers bouncing around the backyard. I'm not totally happy with the way that it turned out but it is a vast improvement. We'll fix it later (much later).


    The challenge came when I realized that the family room window was not the same size as the living/dining room window, which I thought they were. Thank goodness I had made a trip to Tuesday Morning and found a longer single rod. It was great because it was long enough but it was not a double-hang rod, nerds. This was problematic due to the fact that this window needed sheers to close for privacy in the evenings, going back to the disturbing reflections we talked about earlier. I didn't have an extra rod for the sheers so I went ahead and hung the curtains and sheers together on the same rod. The brackets block the sheers from closing; this is what needs to be fixed. Long, long story short, here they are for now!


    Thursday, June 2, 2011

    Closet Clutter


    Don't we all have a closet (or two, or ten) in our house that piles up with misc. junk? You know, the closet that you walk by and just the close proximity makes you shudder. It happens to the best of us. You start by shoving something random in there and then another and before you know it there is an unwanted sink and a year's supply of Modge Podge. Just in case.

    Here is a before and after to get you going.


    Don't let excess clutter happen to you. Hire me to tackle it for you or just burn it all. Happy organizing!

    Wednesday, May 11, 2011

    His Closet

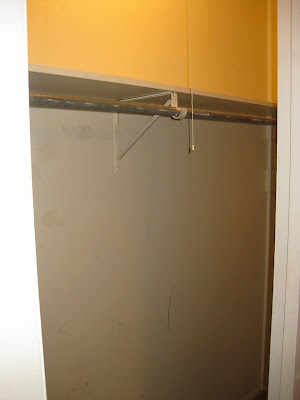
    Who doesn't love a good before-and-after on a closet? I, for one, love them. When we moved into our 1960s era house our closets were more than lacking they were suffering. They were suffering from an ailment that I like to call, Underutilized Space Syndrome (USS). All of our bedroom closets are standard six foot reach-ins. They all looked very similar to this on move-in day:


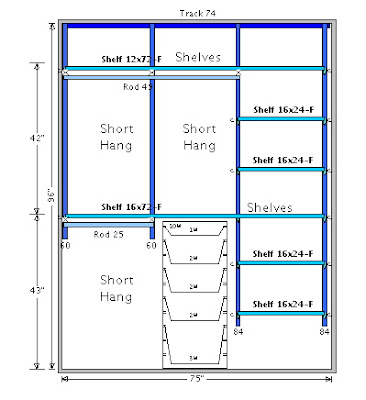
    For a girl who spends the better part of her days organizing other people's closets and homes this would just not do. Off to The Container Store (aka. Heaven on Earth) to get custom Elfa closet designs! We started by reconfiguring the two master closets and the nursery closet. Sorry guests, your closet will have to wait.

    Here is what my Elfa designer and I came up with for the Hubs closet:

    First things first, we had to tear out the existing closet components and make-ready the walls for our brand new Elfa closet. Such an improvement already!


    From there it was just a half-dozen screws, placement and hanging of shelves and we were finished. Just to demonstrate how easy it can be, especially after a little practice, I hung the entire closet by myself. Nothing beats surprising your hub with some finely tuned organization. Buh-bye USS!


    If you need some help with your closet, pantry, laundry room, garage, etc. just give me a shout! I can happily help from anywhere thanks to the interwebs and Skype.

    Happy organizing!

    Thursday, April 14, 2011

    The Cleanest Room

    At least I would like to believe that my laundry room is the cleanest in the house. It should be, right? The whole purpose of the laundry room is to get things clean. And since most people don't love to do laundry it should be a pleasant room that makes it a bit easier to spend time in there. Here is what our laundry room looked like when we moved in. Wish that I had a better picture...
    Here it is now.

    (Like how I still don't have a new switch plate?)


    It's amazing how changing out some hardware and moving some cabinets around can totally change the look of a small room. The hardware was cheap and the labor (thanks to my hubs and brother-in-law) was free!

    These are some of my design inspirations...a girl can dream.

    (Courtesy of Design Sponge)

    (Courtesy of House Tweaking)

    (Courtesy of Wish.ca)

    Thursday, April 7, 2011

    This Chair is being Droll

    Not really, they're nice chairs actually. Free in fact - my favorite kind ofchair. These two chairs were passed down to us by our sweet D.C. neighbors, Sara and Trenor. We used them as-is for a year before I got bored one day and decided to give them a little butt-lift, they are chairs after all.


    All it took was a little sanding, priming, painting and stapling. Easy peasy.


    I scored the Dwell fabric from JoAnn's and fell in love with the pattern. All in all it cost $10 for a quart of Valspar paint and another $8 for the fabric (I had a coupon).


    Cheap makeover and I had plenty of paint and fabric left over for other projects.